Pages var _gaq = _gaq || []; _gaq.push(['_setAccount', 'UA-1743

Showing posts with label diy. Show all posts

Thursday, January 10, 2013

my 2013 goals board : an easy DIY

we are almost halfway through january, everybody!
zoooom.

how about an easy DIY?!
last year, i made a simple canvas goals board for my 2012 goals ; i decided to do the same this year.
its a pretty large canvas [16x20] & i have it hanging in the living room.
here are the instructions i used last year.
i used scrapbooking stickers ; painted over them & then peeled them off once the paint dried.
after that, i took a purple marker & outlined all of the letters.
super easy. and a great visual reminder of all the things i want to do this year.
easy, right?
how do you display your goals so you dont forget about them throughout the year?

Wednesday, November 21, 2012

crafting [eating?] with daphne : homemade FROSTY PAWS! :

hey everybody!
wednesday today ; do you have big plans for tomorrow?
i have tomorrow AND friday off [woop woop!] and we have a *ton* going on.

please?
lets talk about dog treats!
when we first got daphne [and i wasnt working 7 days a week!], i was making a bunch of her dog treats.
one of my [and daphs] favorites?
homemade frosty paws!!
they are easy, affordable [im sure you have everything you need already!] & taste delish.


let me tell you ; daphne eats well.
she gets organic, free range meat & all of her treats are made in the us & contain NO nasty preservatives & other crap.
we eat a good, organic diet & so does our pup.
[she deserves it & we want her around for a long time]

so, how do you make frosty paws? 
[you can even make them vegan if you use soy // almond // coconut yogurt]
we used popsicle molds from ikea, but you can always use paper cups.


what you need : 
*1 container [mine was 32 oz] of plain yogurt [flavored yogurt has too much sugar for dogs & humans]
*1 ripe, smashed banana
*2 tablespoons of nut butter [daphne loves almond, peanut & sunflower]
*2 tablespoons of raw, unprocessed honey [buy local, raw honey!] [honey from china has TONS of junk & impurities!]

how to do it : 
1) mix everything together in a bowl & then spoon into your mold // cups
2) place in freezer

really, these are so easy & they are a great treat.
last week, daphne was bit at doggy daycare & we gave her 1/2 a popsicle each night when we had to put her medicine on.

thank you!


Wednesday, August 29, 2012

: crafting with daphne : super easy dog food container :

happy wednesday!
after taking over half of august off ; i am feeling ready to come back to blogging!

todays [easy!] project is for the dogs [or cats!]!!


daph says 'heeeeyyyy!'

because dogs are expensive & i am so frugal ; i wanted to make or upcycle a lot of items for daphne.
before we officially adopted daph, blake & i headed to my favorite thrift store in the cities on a search for affordable dog items. we found two [really cute!] food bowls for 10 cents, a placemat to go under them for 25 cents, and a couple of shirts that i turned into tug toys.

we also found a giant popcorn tin ; similar to this one.

great idea : chalkboard painted dog food tin!
this project took very little time & turned out really cute.


i used chalkboard paint to cover the body & the lid of the popcorn tin.
once they dried, i took some crayola chalk and wrote 'daphne's food' on the front.

easy. simple. cute.


and since we are talking about dog food : 
daphne eats this brand of food [which contains meat!], but 90%+ of her treats are homemade // vegan.
[i will be dedicating a few posts to daphnes treats & food!]
i dont love that she eats meat ; but dogs need more protein than humans [especially a 55+ pound puppy that gets LOTS of exercise!], so i respect what her dog-body needs.

and one last picture : we live a few blocks away from a bandshell that plays live music every night of the summer. most nights, we walk down to the lake & listen to music.
daphne crawled in blakes lap & my little heart melted!
[do you see her 2 foot tail on the ground?!]

Wednesday, July 25, 2012

: i totally want to make that : an EASY DIY workout shirt! :

hey everybody!
today is day 4 of our ride.

i am a pretty simple girl. [you know that, right?] blake & i live a pretty simple [eco, happy, smart] existence. if we need something, we find a way to create it ourselves. if its something we really need [a new computer, a bike chain] we are sure to have the money saved up before we purchase it. and, we decorate our home [lives!] with fun things that are passed down, thrifted or repurposed.

so, this bike ride? well, it is expensive. the ride itself is super affordable. but bike gear? its not cheap. for this ride, i am taking 3 pairs of bottoms [a bike skirt//liner, one pair of liners [[you add a pair of running shorts on top]] and bike shorts] & a few moisture-wicking shirts, 10 pairs of running socks [NOT a fan of wet feet!] & a couple of sports bras. a lot of bikers love bike jerseys ; i do not.
i like feather-light tops ; tops that are super light fabric & dont cling to my skin.


i bought a couple tops from old navy's fitness line & was really happy with them. well, i wanted a few more, but didnt want to spend money [duh!]
sooo, i made my own!
i found this really great tutorial & made a couple of my own.
the shirts i used were 70 cents each from a local thrift store.


i made four shirts & only two of them turned out really well.
[the other two will be used as dust rags]
if you are going to make a shirt like this ; be sure to use a shirt that is a size or two big for you & an older, 'more-loved' shirt will fit the best. a new, heavy cotton shirt probably wont fit & bend as well as you would like!


you can check out our day today here & yesterday.
uh, helllo [77 miles today + 81 miles yesterday AND 85 miles tomorrow]
PLEASE meet me tonight with huge vegan cupcakes & an ice pack!


Sunday, July 22, 2012

get down with your 'eco' self : how to make your own deodorant! :


Hi everyone! My name is Aisha (I-sha) I blog over at My Little Sunshine. I am a tofu lovin', vegan momma and I blog about my life as a mom. Check out my blog for some fun tutorials, recipes, and laughs. Enough about me. I am so happy to be guest posting on Diana's blog today!  

Since Diana is away sweating/working her butt off on her bike, I figured, what a perfect topic! Sweat! So not really sweat, but deodorant...
How to make your own deodorant! 


Most commercial deodorants are full of harmful chemicals. They are made with aluminium which has been linked to Alzheimer's, breast cancer and more. Homemade deodorant is a safe and cheap alternative! Plus, your armpits will smell like coconuts.
What's not to love about that?!  


What You Need


How to do it 


Here are some common questions

I have really sensitive armpits. Will this recipe still work for me?
Yes, but substitute the cornstarch for arrowroot powder.

How should I store it?
Coconut Oil turns into a liquid when the temperature is above 76 degrees. Store the deodorant in a cool, dark place or keep it in the refrigerator. Whenever it does turn into a liquid, pop it in the refrigerator for 5-10 minutes.

How long will one batch last?
I made mine 2 months ago, and I still have over half left. A little bit goes a long way.

Is this deodorant as strong as commercial deodorant?
No. This is a mild deodorant. It will prevent you from smelling, but I do not suggest that you wear it while running a marathon. I keep an emergency stick of store bought deodorant just in case.

What if it gets on my clothes?
Just wash your shirt as you normally would and it will come right off.

I don't like coconuts and I don't want my armpits to smell like them. What should I do?
Buy refined coconut oil instead. The smell of coconuts is very minimal compared to unrefined.

If you have any more questions, you can shoot me an email – aisha.mylittlesunshineshop@gmail.com
Ciao!
_____________________________________________________________________
i LOVE this post! i use TOMS deodorant on long bike rides, but i am for sure making this when i get back home!

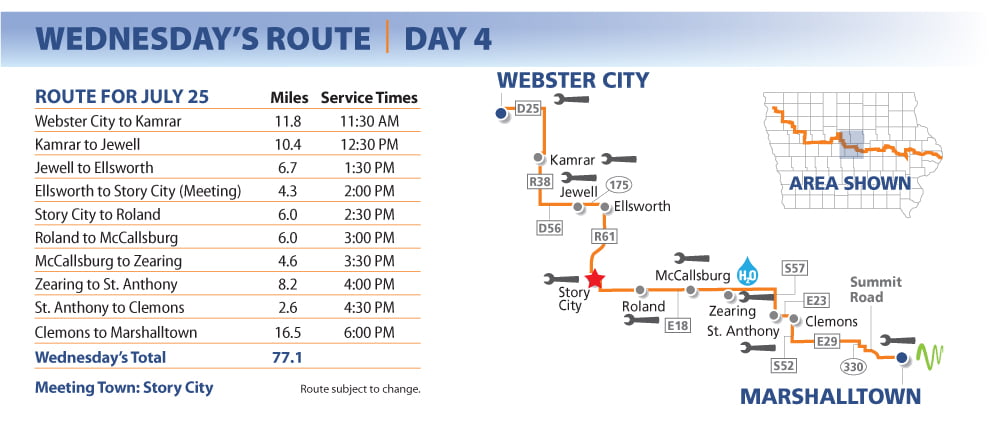
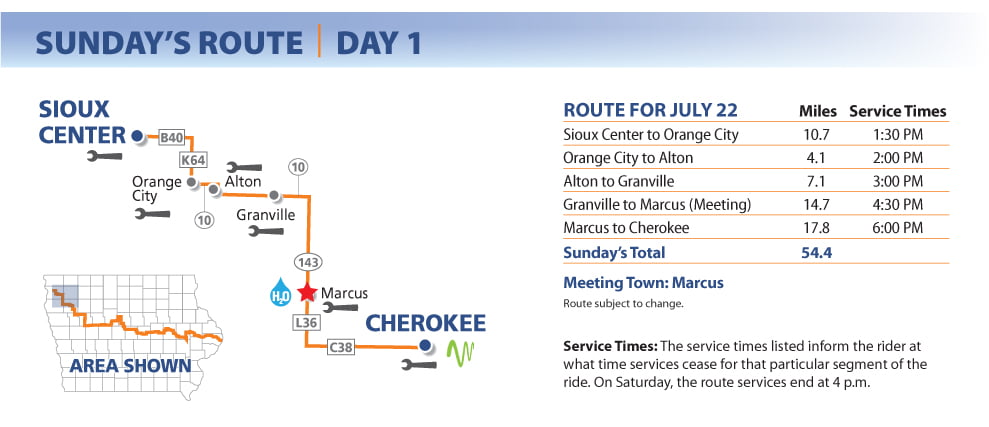
and ps : for those of you wondering, this is the route // towns // mileage we are riding today [day 1!]

stay connected with aisha!

Thursday, March 15, 2012

home DIY : sew your own curtains

happy thursday!!
this week month has been blurring by.
i have been feeling 'meh' & slightly uninspired lately ; more on that later [maybe].

today, i have vanessa here sharing a super simple project.

here we go :
__________________________________________________________________________________

A set of curtains is a great first-project for beginners on the sewing machine. This is the second set of curtains I've sewn for my home, and I can't wait to make a third.

The quantity of fabric can be overwhelming for some people, but if you take this step by step and follow the instructions, it's a breeze.
[I originally found this sewing guide in 2009 here. ]
how-to-sew-curtains
How to sew easy curtains:

  1. Measure the window. Multiply the width x2 for the length of the fabric. Add 8" to the height.
  2. Cut your fabric to desired length. You should have two panels.
  3. Fold each side and the bottom 1", then 1" again and sew 1/2" from the edges. (Basically down the middle.)
  4. Fold the top down 1", then another 1" (like the sides and bottom). Pin this fabric, then fold down an additional 3" and transfer all pins to capture all three layers.
  5. Sew right down the middle.
  6. Sew 1" from the top to form the rod pocket. (I like to leave a little extra room and sew 1.25" - 1.5" depending on the look I'm going for.)
sewing-curtain-hem
Voila! You have curtains!

nice!
one of the things i am looking forward to once we own a home is all the decorating and diy projects i can do!!

have you ever sewn curtains before?! 

Tuesday, January 10, 2012

top 10 tutorials using items you already have laying around!

hey!
you've been here before, right?
then you know how much i love to reuse/repurpose/recycle items around the house.
most of the crafts/diys i do, involves items that i already have handy.

i scoured the interwebz to find my top 10 tutorials that require items that you [probably] have sitting around the house.
all of them take very little time, make great gifts and help save the planet!

here we go : 


2) plant seedlings in toilet paper rolls! 


3) super easy sunshine sugar scrub [this is a great gift for a new mama or a co-worker/neighbor/friend]


4) make leg warmers//boot socks from old sweater sleeves


5) paint-dipped silverware [these would be *so cute* displayed in a shadow box in the kitchen!!]


 6) terrarium made from small jars [i would LOVE to make this!!]


 7) sewn banner made from paint chips!


 8) easy candle upcycle [for all those 3/4 melted candles]


 9) make a wreath from a VHS tape!!! [this is soo clever!]


 10) make a stocking from an old sweater [this is on my list for next christmas!]

people are so creative, i love it.
any of these you plan to try out?
what projects are you working on?

thanks for reading, everybody. i appreciate you!

Wednesday, September 14, 2011

: guest post diy project from victoria of one crafty mama! :

woo hoo!
i have such a fun project to share today.
did you know that i have an early childhood teaching degree?
i do ; and i have worked with kids with 10 years.
[i have a special place in my heart for toddler/preschool homemade projects]

take it away, victoria :

Hey There! 

I'm Victoria from One. Crafty. Momma. I blog about all kinds of things... my awesome toddler, my pretty sweet Muffin, arts and crafts, lots of super cool and easy toddler projects, and sometimes about me! :) Yep, I think that about sums it up! 

Like many of you, Pinterest has become such a great inspiration in my crafting lately! You can follow my boards HERE. Anywho, a few weeks ago, Diana pinned this totally awesome Gas Pump on one of her boards and I immediately knew I had to make it! My little one is completely obsessed with "filling up" at the tank lately!

So, without further ado, here is what Diana pinned : 


You can find the original instructions here. However, since I just used it as inspiration, I took a little creative liberties with it! 

I took two boxes, the same size, and covered them in Kraft Paper (you can use wrapping paper if you want). Then hot glued them together.  I made the cut outs with my Cricut, and used stickers for the buttons. Then I laminated everything. And hot glued it all in place. I felt like this would make it much more durable. He is 3 after all!


For the "pump", I attached some tubing (Lowe's. 22 cents a foot) to an old handle from a cleaning bottle. (I washed it thoroughly!!!) I hot glued some velcro to the side of the pump, and a small piece to the actual "pump" so it stuck. The small circle is a baby food cap, with a laminated circle on it. I hot glued the other side of the tubing to it.

He's pretty happy with it! Haha! It has been played with A LOT! :)  The only thing I would change is maybe to put a sand bag in the bottom of it, or some kind of weight.


Thanks for having me Diana!! I love your blog, and I'm really honored to be guest posting over here!! 

Be sure to check back with my blog! I am about to open my etsy shop, and plan on having lots of fun over there in the coming weeks! 

yay! thanks girl ; looks so great.

Saturday, July 23, 2011

: gift guide : baby diy edition! :

guess who is having a baby?!?!
[haha : not me]


so, i am not sure what is in the water lately, but i have 5 friends that are having babies in the next couple months!

since i love making stuff [and i know you do too..] i hit up pinterest and found a handful of really rad projects.

here are my faves!
[wish me luck on all these baby gifts ;) ]


arent these things adorbs?!
people are so talented!

thanks for reading.